Posted :
A
GridView
is simply a
grid of views , it is a
subclass of
AbsListView
, so the methods
and fields defined for AbsListView ,
apply to a GridView . Another subclass of
AbsListView is
Listview
.
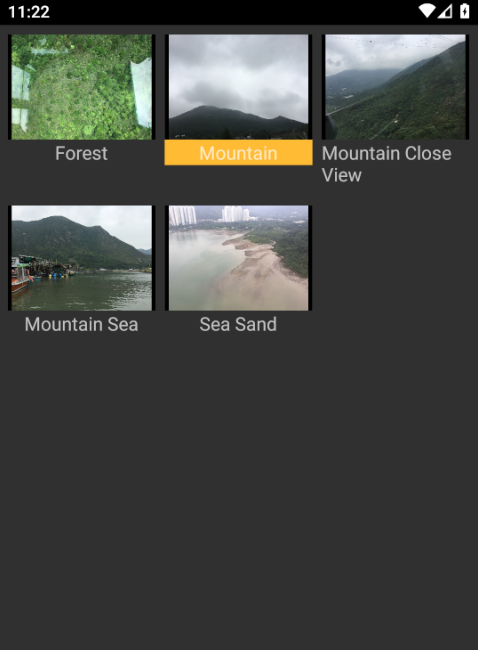
This
tutorial will show
how to create a
GridView
, the final
product is shown below .


Start by defining
the layout of the MainActivity
activity_main.xml , which contains
a single child , the GridView :
<!-- activity_main.xml in the layout folder .-->

<?xml version="1.0" encoding="utf-8"?>
<FrameLayout xmlns:android="http://schemas.android.com/apk/res/android"
    xmlns:tools="http://schemas.android.com/tools"
    android:layout_width="match_parent"
    android:layout_height="match_parent"
    tools:context=".MainActivity">

    <GridView
        android:id="@+id/gridView"
        android:layout_width="match_parent"
        android:layout_height="match_parent"
        android:numColumns="3"
        android:stretchMode="columnWidth"
        android:horizontalSpacing="8dp"
        android:verticalSpacing="16dp"
        android:listSelector="@drawable/grid_item_selected"
        android:padding="8dp" >
    </GridView>

</FrameLayout>
The
android:stretchMode attribute is
related to the remaining space , and is
used
to specify
how the remaining available space is divided
.
By default it has a value of android:stretchMode="columnWidth" ,
which is columns will be equally stretched . If set
to android:stretchMode="none" , then the
remaining space is not stretched , if set to spacingWidth ,
then the remaining space is stretched equally between columns , if
set to spacingWidthUniform , then the remaining space is divided
equally around and between the columns .


The
android:numColumns attribute is used to
specify the number of columns
. If set to
android:numColumns="auto_fit" , and
no android:columnWidth attribute is
set , then the number of columns is set to
2 . If set to android:numColumns="auto_fit"
and
android:columnWidth
is set to a value , as in android:columnWidth="20dp" ,
then the number of column is calculated based on the
available remaining space , while guarding the set
horizontal spacing , in other words , factoring out
horizontal spacing .
If the number of
columns is set , then it is the set number of
columns .
If the number of columns is not set or is set to
a negative value , then it
is set to 1 .
android:stretchMode
is always applied as specified , so for example ,
setting a number of column , and no column width ,
if the stretchMode
is set to columnWidth ,
then the available space , factoring out any
horizontal spacing , is divided evenly between
the set number of columns .
Horizontal
spacing between
columns ,
and vertical spacing between rows , can be set using
android:horizontalSpacing , and android:verticalSpacing .
The
android:listSelector is used to
specify an effect
, when an item in the
grid is selected . In this example ,
a drawable android:listSelector="@drawable/grid_item_selected"
has been specified as the effect , which is setting the
background color to orange .
The drawable has been
defined in the drawable folder , and has the following code :
<!-- grid_item_selected.xml in the drawable folder .-->

<?xml version="1.0" encoding="utf-8"?>
<selector xmlns:android="http://schemas.android.com/apk/res/android">
    <item android:state_pressed="true"
            android:drawable="@android:color/holo_orange_light"/>
</selector>
Having
defined the GridView and its attributes ,
the
layout for an item
in the GridView
must be defined , as follows :
<!-- grid_item.xml in the layout folder .-->

<?xml version="1.0" encoding="utf-8"?>
<LinearLayout
    xmlns:android="http://schemas.android.com/apk/res/android"
    android:orientation="vertical"
    android:layout_width="match_parent"
    android:layout_height="wrap_content">

    <ImageView
        android:id="@+id/ivPhoto"
        android:layout_width="match_parent"
        android:layout_height="90dp"
        android:background="@android:color/black" />

    <TextView
        android:id="@+id/tvLabel"
        android:layout_gravity="center_horizontal"
        android:layout_width="wrap_content"
        android:layout_height="wrap_content"
        android:textSize="16sp" />
</LinearLayout>
Having
defined the layout for an item , a
controller must be created , to manage the items
of a GridView , as for example ,
their creation , and data connection . This is
done by extending the BaseAdapter class ,
as follows :
/* GridView_Controller.java */

package com.twiserandom.mobileapps.demo.gridview;

import android .content .Context;

import android .view .View;
import android .view .ViewGroup;

import android .widget .BaseAdapter;
import android .widget .ImageView;
import android .widget .TextView;

public class
        GridView_Controller
            extends BaseAdapter {

    private int image_ids [ ] = {R .drawable .img_001_forest ,  R .drawable .img_002_mountain ,
                                 R .drawable .img_003_mountain_close_view ,
                                 R .drawable .img_004_mountain_sea ,
                                 R .drawable .img_005_sea_sand };
    private String image_label [ ] = {"Forest" , "Mountain" ,
                                      "Mountain Close View" ,
                                      "Mountain Sea",
                                      "Sea Sand" };
    private Context context;

    GridView_Controller
            (Context context ){
        this .context = context; }

    class Image {
        String image_name;
        int image_id;

        Image
                (String image_name , int image_id ){
            this .image_name = image_name ;
            this .image_id = image_id ; } }

    @Override
    public int
            getCount
                ( ){/* Return the data
                Count */
        return image_ids .length ; }

    @Override
    public Object
            getItem
                (int position ){/* Return an object
                    representing the data at the
                    given position , to be retrieved
                    later on , for example when
                    handling click events . Can
                    return null , if have nothing
                    to pass on .*/
        return new Image (image_label [position ] , image_ids [position ] );}

    @Override
    public long
            getItemId
                (int position ){/* Can return -1 , or 0 ,
                    if do not have own ids to pass on .
                    If have own generated identifiers ,
                    they can be passed here , to be retrieved
                    later on , for example when handling
                    click events .*/
        return image_ids [position ]; }

    @Override
    public View
            getView
                (int position , View convertView , ViewGroup parent ){/*
                    Return an item's View .*/

        if (convertView == null ){/* Views are recyclable , so
            this means they are reusable , so only inflate
            a view if it is not null .*/
            convertView = View .inflate (context , R .layout .grid_item , null ); }

        ImageView ivPhoto = convertView .findViewById (R .id .ivPhoto );
        ivPhoto .setImageResource (image_ids [position ] );

        TextView tvLabel = convertView .findViewById (R .id .tvLabel );
        tvLabel .setText (image_label [position ] );

        return convertView; } }
Now
it is time to create the MainActivity class ,
in the MainActivity.java file . This class
will
connect the controller to the GridView
,
and it will set an OnItemClickListener, for the GridView .
/* MainActivity.java */

package com .twiserandom .mobileapps .demo .gridview;

import androidx .appcompat .app .AppCompatActivity;

import android .os .Bundle;

import android .view .View;

import android .widget .AdapterView;
import android .widget .GridView;
import android .widget .Toast;

public class
        MainActivity
            extends AppCompatActivity {

    @Override
    protected void
            onCreate
                (Bundle savedInstanceState ){
        super .onCreate (savedInstanceState );
        setContentView (R .layout .activity_main );

        GridView gridView = findViewById (R .id .gridView );
        gridView .setAdapter (new GridView_Controller (this ) ); /* Connect
            the controller to the GridView .*/
        gridView .setOnItemClickListener (new AdapterView .OnItemClickListener ( ){
            @Override
            public void
                    onItemClick
                        (AdapterView  parent , View view , int position , long id ){
                GridView_Controller .Image image =
                        (GridView_Controller .Image ) parent .getItemAtPosition (position );/*
                        Get the attached data .*/
                Toast .makeText (MainActivity .this ,
                        image .image_name + " " + id , Toast.LENGTH_LONG )
                      .show ( ); /* Show
                      a toast , containing the attached data ,
                      and the generated ID .*/ } });}}
 Home
Home