Posted :
A
ListView is a list of views , this tutorial
will show how to
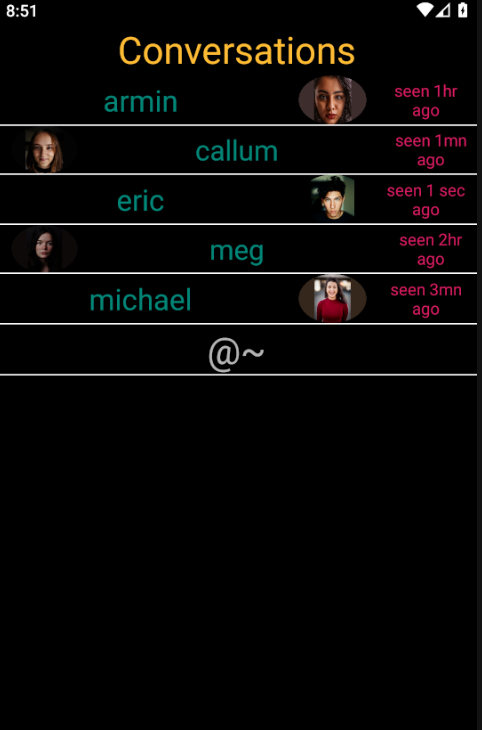
implement a ListView in android . The final
product is shown below .
Start
by creating the application
main activity layout
file ,
activity_main.xml :
<!-- activity_main.xml -->

<?xml version="1.0" encoding="utf-8"?>
<FrameLayout xmlns:android="http://schemas.android.com/apk/res/android"
    xmlns:tools="http://schemas.android.com/tools"
    android:layout_width="match_parent"
    android:layout_height="match_parent"
    tools:context=".MainActivity">

    <ListView
        android:id="@+id/list_view"
        android:layout_width="match_parent"
        android:layout_height="match_parent"
        android:divider="@android:color/white"
        android:dividerHeight="1dp"
        android:headerDividersEnabled="false"
        android:footerDividersEnabled="true"
        android:listSelector="@drawable/lv_item_pressed"
        android:background="@android:color/black" />

</FrameLayout>
The
layout of this activity is a FrameLayout , a
frame layout stacks its childrens on top of one another ,
this layout has only one child ,
which is the ListView .
The
majority of the attributes set for the
ListView
are self explanatory , such as the
layout_width or
layout_height .
The listSelector is just the effect ,
for when an item in the ListView is
selected , in this example a drawable is drawn .
The divider
is the divider between the views in the ListView .
A ListView can have a header , and a footer ,
the headerDividersEnabled , and
footerDividersEnabled
, allows the header and the footer to have a divider displayed .
Having
specified the layout attributes for the ListView ,
it is now time to
create the view for an item in the ListView .
In this example , each
alternate row will have its own view , as such there
are two layout defined , list_view_item.xml ,
and list_view_item_alt.xml .
<!-- list_view_item.xml -->

<?xml version="1.0" encoding="utf-8"?>
<LinearLayout xmlns:android="http://schemas.android.com/apk/res/android"
    android:layout_width="match_parent"
    android:layout_height="wrap_content"
    android:orientation="horizontal">

    <TextView
        android:id="@+id/lv_item_name"
        android:layout_width="0dp"
        android:layout_weight="6"
        android:layout_height="wrap_content"
        android:paddingTop="4dp"
        android:paddingBottom="4dp"
        android:textColor="@color/colorPrimary"
        android:textSize="25sp"
        android:gravity="center_horizontal" />

    <ImageView
        android:id="@+id/lv_item_img"
        android:layout_width="0dp"
        android:layout_weight="2"
        android:layout_height="match_parent" />

    <TextView
        android:id="@+id/lv_item_time"
        android:layout_width="0dp"
        android:layout_weight="2"
        android:layout_height="match_parent"
        android:paddingEnd="4dp"
        android:textColor="@color/colorAccent"
        android:textSize="14sp"
        android:gravity="center" />
</LinearLayout>
<!-- list_view_item_alt.xml -->

<?xml version="1.0" encoding="utf-8"?>
<LinearLayout xmlns:android="http://schemas.android.com/apk/res/android"
    android:layout_width="match_parent"
    android:layout_height="wrap_content"
    android:orientation="horizontal">

    <ImageView
        android:id="@+id/lv_item_img"
        android:layout_width="0dp"
        android:layout_weight="2"
        android:layout_height="match_parent" />

    <TextView
        android:id="@+id/lv_item_name"
        android:layout_width="0dp"
        android:layout_weight="6"
        android:layout_height="wrap_content"
        android:paddingTop="4dp"
        android:paddingBottom="4dp"
        android:textColor="@color/colorPrimary"
        android:textSize="24sp"
        android:gravity="center_horizontal" />

    <TextView
        android:id="@+id/lv_item_time"
        android:layout_width="0dp"
        android:layout_weight="2"
        android:layout_height="match_parent"
        android:paddingStart="4dp"
        android:textColor="@color/colorAccent"
        android:textSize="14sp"
        android:gravity="center" />
</LinearLayout>
Having
created the layout of the items
to be displayed
in the ListView , it is now time
to create the controller , which will manage
each item creation and display in the ListView ,
this is done by
extending the BaseAdapter class ,
like so :
package com .twiserandom .mobileapps .demo .listview;

import android .content .Context;
import android .view .View;
import android .view .ViewGroup;
import android .widget .BaseAdapter;
import android .widget .ImageView;
import android .widget .TextView;

public class
        ListViewController
            extends BaseAdapter {

    private Context context;

    private String names [ ] = {"armin" , "callum" , "eric" , "meg" , "michael" };
    private int img_ids[ ] = {R .drawable .armin , R .drawable .callum , R .drawable .eric ,
                        R .drawable .meg , R .drawable .michael };
    private String last_seens [ ] = {"seen 1hr ago" , "seen 1mn ago" , "seen 1 sec ago" ,
                            "seen 2hr ago" , "seen 3mn ago"};
    ListViewController
            (Context context ){
        this .context = context; }

    class
            Person {

        String name;
        int img_id;
        String last_seen;

        Person
                (String name , int img_id , String last_seen ){
            this .name = name;
            this .img_id = img_id;
            this .last_seen = last_seen; }}


    @Override
    public int
            getCount ( ){/*
                Return the number of data
                elements .*/
        return names .length; }

    @Override
    public Object
            getItem
                (int position ){/* Can return null ,
                    if have nothing to pass on .
                    Data passed here can be gotten ,
                    for example when implementing
                    a click listener for an item
                    in the ListView .*/
        return new Person (names [position ] ,
                           img_ids [position ] ,
                           last_seens [position ] ); }

    @Override
    public long
            getItemId
                (int position ){/* Can return 0
                    , or -1 , if don't have own
                    generated IDs , or if not
                    interested in this method .
                    This created id can be used
                    for example , when implementing
                    a click listener for an item in
                    the ListView .*/
        return img_ids[position ]; }

    @Override
    public View
            getView
                (int position, View convertView , ViewGroup parent ){/* Return a view
                    to be displayed in
                    the ListView .*/

        if (convertView == null ){/* The items in
            the list view are
            recyclable , which means they
            are reusable , so only inflate an
            item in the ListView when
            necessary .*/

            if (position % 2 == 0 )/* If position is
                even , inflate
                the even list view item .*/
                convertView = View .inflate (context , R .layout .list_view_item , null );
            else /* else inflate the odd list view
                item .*/
                convertView = View .inflate (context , R .layout .list_view_item_alt , null ); }

        /* Set the data to be displayed */
        TextView tv_name = (TextView ) convertView .findViewById (R .id .lv_item_name );
        tv_name .setText (names [position ]);

        TextView tv_date = (TextView ) convertView .findViewById (R .id .lv_item_time );
        tv_date .setText (last_seens [position ]);

        ImageView iv_picture = (ImageView ) convertView .findViewById (R .id .lv_item_img );
        iv_picture .setImageResource (img_ids [position ]);
        return convertView;
        /* Return the view to be displayed */ } }
Having
created the controller class , it is now time
to
create the MainActivity class ,
which
will connect the ListView to
its controller , and where
a header , and a footer , will also be added
to the ListView .
/* MainActivity.java */
package com .twiserandom .mobileapps .demo .delete;
import androidx .appcompat .app .AppCompatActivity;
import android .os .Bundle;
import android .view .View;
import android .view .ViewGroup;
import android .widget .AdapterView;
import android .widget .ListView;
import android .widget .TextView;
import android .widget .Toast;
public class
MainActivity
extends AppCompatActivity {
@Override
protected void
onCreate (Bundle savedInstanceState ){
super .onCreate (savedInstanceState );
setContentView (R .layout .activity_main );
ListView lv = findViewById (R .id .list_view );
/* Get the ListView */
View header = View .inflate (this , R .layout .list_view_header , null );
/* Inflate the header layout , and add it to the list view .*/
lv .addHeaderView (header );
View footer = View .inflate(this , R .layout .list_view_footer , null );
/* Inflate the footer layout , and add it to the list view .*/
lv .addFooterView (footer );
lv .setAdapter (new ListViewController (this ) );
/* Connect the controller to the list view .*/
lv .setOnItemClickListener (new AdapterView .OnItemClickListener ( ){
/* Add an item click listener for the list view ,
other types of listeners exist , such as
setOnItemLongClickListener .*/
@Override
public void
onItemClick
(AdapterView parent , View view , int position , long id ){
ListViewController .Person person =
(ListViewController .Person ) parent .getItemAtPosition (position );
/* Get the data attached in the getItem method
of the controller .*/
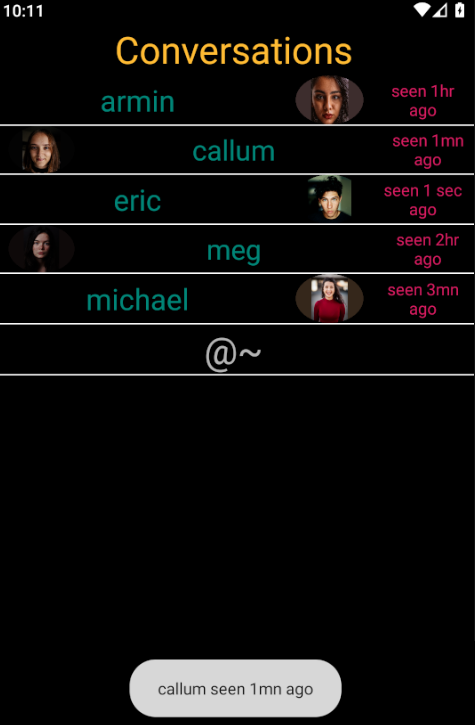
Toast .makeText (MainActivity .this ,
person .name + " " + person .last_seen ,
Toast.LENGTH_LONG)
.show ( );/* Show a toast containing
the person name , and last seen .*/ } }); }}
In
the preceding code , a header , and a footer
were added to the ListView ,
so
the header and footer
must have a layout .
These must have
layouts , were inflated in the MainActivity, and
are the following :
<!-- list_view_header.xml -->

<?xml version="1.0" encoding="utf-8"?>
<LinearLayout xmlns:android="http://schemas.android.com/apk/res/android"
    android:orientation="horizontal"
    android:layout_width="match_parent"
    android:layout_height="match_parent">

    <TextView
        android:layout_width="match_parent"
        android:layout_height="wrap_content"
        android:text="Conversations"
        android:textSize="32sp"
        android:textColor="@android:color/holo_orange_light"
        android:gravity="center" />
</LinearLayout>
<!-- list_view_footer.xml -->

<?xml version="1.0" encoding="utf-8"?>
<LinearLayout xmlns:android="http://schemas.android.com/apk/res/android"
    android:orientation="horizontal"
    android:layout_width="match_parent"
    android:layout_height="match_parent">

    <TextView
        android:layout_width="match_parent"
        android:layout_height="wrap_content"
        android:text="@~"
        android:textSize="32sp"
        android:gravity="center" />
</LinearLayout>
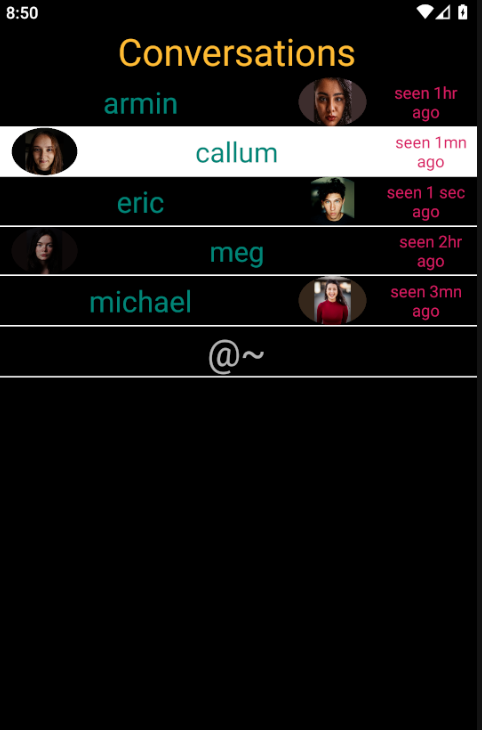
The
listSelector for the ListView
specified in activity_main.xml as
android:listSelector="@drawable/lv_item_pressed" ,
refers to a drawable .
The drawable
set the pressed
item to have a white background , as shown below :
<!-- lv_item_pressed.xml -->

<?xml version="1.0" encoding="utf-8"?>
<selector xmlns:android="http://schemas.android.com/apk/res/android">

    <item android:drawable="@android:color/white"
        android:state_pressed="true"/>
    <!-- item pressed -->
</selector>
 Home
Home